Posts

Showing posts from February, 2019

Peek-a-boo Box|Gift Ideas|Packaging Ideas

Image
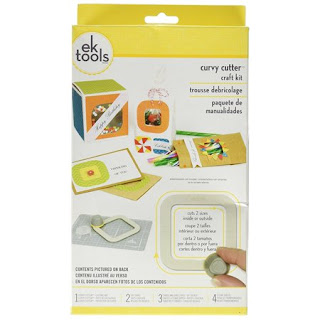
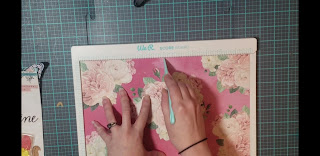
Hello everyone! Hope you're having a wonderful week so far! Today I wanted to share a fun box tutorial, that can be made quick and easy using the EK Tools Square Craft Kit , or a single score board and exacto knife will work perfectly. I began my box base, by laying down a 12x12 patterned cardstock on my score board. I'm then going to score at the 4" mark, rotating my paper, making sure I scored every side. Next, I decided to completely remove each ot the for corners of the paper. Following along the score lines. Once that's finished, I can lay my paper upside down, and using the EK Tools Square Kit, I will cut a window on each of the remaining for "flaps" The kit includes clear backing paper,  with adhesive,  making it even easier to apply, so I can achieve the desired peek-a-boo look. Now comes the fun part, decoration each side of the box!  Once all the main details are adhered, i can proceed to create the lid. You will need a 6.25x 6.25 p

Emo Bunny

Image
Hello everyone! Eny here, with another OddBall Art Stamps project. Today, I'm gearing up for Easter egg hunts, with this adorable image #83B Big Eye Bunny Girl Maddelina.  I started my main card project by coloring the image using some Prismacolor Scholar pencils. I make sure to print my image on Neenah Vellum Bright cardstock.  It has the right amount of tooth on the surface of the page, making it easy to blend my colors together. For my background I sprayed some Picked Raspberry Distress Oxide Spray over mixed media cardstock. I paired it with q floral patterned paper,  to fully being in the spring theme. I layered some journal cards, added sequin and my card is complete! A very clean and simple design, but packed with creepy cuteness! I hope you enjoyed this quick look at how I create these fun cards.  I hope you visit the OddBall Art website, and sign up for the weekly newsletter,  that is packed with Inspiration, new releases and freebies! If you decide

Fresh Start, feat OddBall Art and special announcement

Image
Hello everyone! I'm here today with another OddBall Art stamps project and some incredible news! But first,  let's dive into this card I created, using IMG#166 Sexy Burlesque Girl Ivy Peekaboo. As soon as I saw this image, I fell In love. I wanted to give a soft look, not only when I colored her, but also with the full finished look. I paired her with vintage colors, in both soft and bold tones, and added American Crafts Moontruck ephemera to embellish. This is truly a versatile image, and perfect t for card making and art jounarl entries. And now, for some amazing news! The full team of Ambassadors has been chosen and today is the big reveal! I'm so proud and honored to have been chosen as Lead Ambassador for OddBall and I hope you will all go and check out the forum to see all the talented ladies! Make sure to also sign up for the newsletter to get latest info on new realease s, and also a freebie Included in every Friday Creepy Cute Chronicles! Cant wait t

Paper Purse Happy Mail Tutorial

Image
Hello everyone! So happy to be with you again for this quick and easy way to create some paper purses, perfect for happy mail projects.  We begin with a piece of paper trimmed to 6x12. Lay the paper down on your score board (or use ruler and stylus) and score at 5 and 7 inches. This will create the main base for your purse. For the sides of the purse I used two 4x6 piece of paper that I scored at the 2, 3 and 4 inch marks.  I then do accordion folds making sure the 3 inch score line is facing inward.  This will allow for the full purse to take shape.  I adhere all pieces together with strong score tape and then I can fully decorate, embellished and fill with goodies!  For the full tutorial, you can check out my YouTube video! I hope this video inspired you in any way! Happy crafting, Eny ❤

A Good Book:Art Journal page, feat. OddbBall Art

Image
Hello everyone! Eny here with another fun and color packed art journal page. I love this OddBall digital stamp appropriately called IMG#24 Bonnie Book Worm. I started my project,  but coloring my image using Prismacolor Scholar pencils. Of course, you can use any medium you love. For my overall design and look, I wanted to create the illusion that she was laying on her bed, in her cozy room. So I used up all the 5 new Tim Holtz Distress Oxide Sprays I as able to purchase. They are vibrant and fun, and very easy to use.  To create the "bed" I used a very bright pink ink pad and directly placed it on my paper, softly running it through the bottom portion of my page.  I wanted to also add pops of gold, and the Ranger Ink Perfect Pearl's is a quick and easy way to do so. I love using the ink pen to get very small details when I lay the powder.  Once all that was finished,  I realized the page needed some accent details. S I got this Cicular Texture s

Pocket Memorydex Tag

Image
Hello everyone! Today I'm sharing a really fun project , using the new My Minds Eye Inc paper kit, Splendor. I'm fan of floral images, and this kit was perfect for creating this project. The kit has a beautiful array of colors , from dark teals,  to soft peaches and neutrals,  and I chose the latter to create a fun pocket memorydex tag. I started by die cutting all my main components with me Sizzix Big Shot: Once everything I cut,  I can begin assembling my main base,  by first laying down my tag over one of the memorydex cards, and folding the free edge inwards,  so my tag is extra secure. To complete my base, I adhere the second memorydex card, and then I can proceed to embellish and decorate each side of my tag. The full projects will have two pockets,  one of each side of the tag, great for adding extra goodies to any happy mail project! I find this to be such a quick and easy way to create an extra special handmade gift! You can

Capricorn Girl|Art Journal Page

Image
Hello everyone, happy Monday! Today I wanted to share with you a entry in my art journal page using IMG#488 Capricorn Girl from OddBall Art.  I began by coloring my min image using my Spectrum Noir Alcohol Markers.  I used a variation is teals, pinks and grays, to create my overall colors combo and shading. I then fussy cut everything and started adding texture and background to my art journal page using distress oxide inks and stencils. I love using various sizes and designs of stencils, to create a unique and layered background. Using my largest stencil I apply distress oxides starting from top to bottom and blending each color as I go. Once the full page was complete, I added gold accents by swiping some gold ink over sections of the page and my main image. I hope today's project has inspired you in any way,and if it did, please share it with me, I love seeing all creations. Make sure to visit OddBall art for a wide selection of creepy cute images. And while yo

Punk Love! OddBall Art Project and News

Image
Hello everyone, I'm so excited to be back posting on my blog, and today I have some exciting news! OddBall Art is starting an Ambassador program, and I'm proud to be the first OddBall Ambassador, spreading creepy cute love wherever I can. All the news will be provided in the OddBall Monthly challenge , starting today, by visiting the website under the forum, or subscribing to the newsletter. For my first project as an Ambassador,  I wanted to add a page on my Art Journal, and this image #237 Dancing Dave is perfect for the overall theme I was going for. I love steampunk art, and let's face it, he's absolutely adorable doing his little jig! I decided to pair him with a Stampendous stamp steampunk set, using my Arteza watercolor brush markers to add some pop and detail. I love the pops of gold ink, and even with everything going on in the background, our little robot friend stands out! I hope you check out OddBall art and all the wonderful images