Posts

Showing posts with the label card making

Stay Home! OddBall Art Interactive card

Image
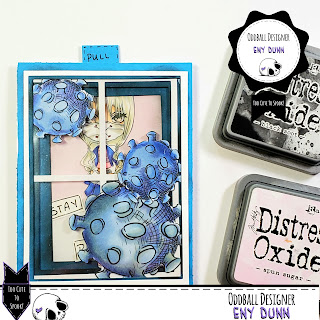
Hello everyone! Eny here, and I'm back with another fun OddBall Art project! Lizzy has been working hard to get some fantastic images out to all her followers/clients and this one is specially wonderful! As we find ourselves in the midst of lock downs worldwide, creators and crafters alike, have been looking for ways to stay entertained and sane. For many of us, we choose to express our frustrations or anxiety through card making or general art. Today, I wanted to share of fun interactive card, that we can all relate to. For this project, I used this month Premium Membership Exclusive stamp set, "Armed and Dangerous". It has everything you need to document this current time in history. I specially love the toilet paper, that can be resized to fit your general theme or look. I have a full tutorial for this card up on my YouTube Channel , that i hope you will all enjoy. If you're not familiar with how the Premium Monthly exclusive wo...

Chin Up Buttercup

Image
Floral images and a great sentiment are my weakness! I love combining different stamp sets, to make my vision come to life. It also serves as a great opportunity to try different mediums and techniques. For this simple card cover, I used the Chin Up Buttercup stamp set from Ink Road Stamps paired with one of the floral images from the Poppy stamp set from Stampendous. I wanted to create levels of color, using my Spectrum Noir Alcohol Markers and my distress inks. I stamped my floral image over Tim Holtz distress watercolor paper, and colored it using various shades of pink, yellow and green distress inks. Once it was dry, I was able to fussy cut it and proceeded to create my background. I created the effect of broad brush stories by using the broad tip aide of my Spectrum markers, going from lightest pink, to darkest pink. At the bottom right corner, I stamped my chin up Buttercup sentiment and added a few details using the mini flowers included in that set. I adhered my large ...

Let's Celebrate Card|Spellbinders Small Die of The Month Kit

Image
Hello everyone and Happy Monday! I love celebrating birthdays and special occasions. It's always fun to be able to create something unique and from the heart, for a special someone. Today I'm sharing a quick card I created uaing this month's Spellbinders Small Die of The Month Kit and a sentiment from last year's June Kit. It may be called small, in no way does it refer to the amount of love put in this kit. For the month June, you get a adorable cupcake die set, with a candles and flower detail, perfect for creating handmade birthday love! I used one of the glitter paper packs from Die Cuts With A View and a American Crafts birthday paper pad, to cut all my images. Creating this cover to celebrate my nieces birthday , I used one of the sentiments from last year's kit, that appropriately says "Let's Celebrate". I adhered all my components over a standard A2 size card (4.25x5.50) and finished it off with some colorful Nuvo Crystal drops! These die ...

Quick and Easy Spring Card|Newton's Nook Stamps

Image
Hello everyone and Happy Friday! Today's card was inspired by this adorable stamp set from Newton's Nook, that has a fun play on the "April showers, bring May flowers" sentiment. I wanted to create a colorful background, so I used my cloud border stencil, and distress inks, to add a soft sunrising effect to my cover. I had in my stash a die set from Peachy Cheap that I acquired a while back, and it has this adorable person holding an umbrella and wearing rain boots. Using the same smooth white cardstock I used for my background, I cut the piece using my Spellbinders Platinum 6 Machine. Added a bit of color to my image my using the same distress inks as my background. I wanted to add a simple ground where my person could stand on , and I created the look of grass by using three different shades of green of my Copic markers. Using a flick motion along the bottom of my cover. I stamped my sentiment, and adhered my die cut, added some enamel accents and done! For th...

Floral Mandala Thank You Card|Color Burst Watercolor Powders

Image
Hello everyone! I've been a little M.I.A , but I'm back with this card I created, using the Floral Mandala background stamp from Hero Arts. Also wanted to use this opportunity to showcase some of the colors included in the Galaxy Color Burst set, and how to use these watercolor powders. I began my card by applying some anti-static powder over my Canson Mixed Media paper and then stamped the  Floral Mandala image  with some Versa Mark Clear Ink. I used my Tim Holtz Stamp Platform to make sure I have a crisp, full image. For my embossed detail, I used Lawn Fawn Rose Gold Embossing powder, and melted it down with my brand new Wagner heat gun. This tool is amazing and worth every penny. It's so quick to melt my embossing powder, and that means less warping of my paper. Once everything was cool, I was able to use three of the Color Busrt colors in the set; Solar Flare, Jupiter and Terrestrial. By gently tapping the bottom of my bottles (once they're upside down), I get e...

Happy BORKday Card|Spellbinders and Ink Road Stamps

Image
Hello everyone and welcome to another Card Making #tutorial, this time using the Count The Stars Stamp and Die set from Spellbinders with the Bork stamp set from Ink Road Stamps! I wanted to create a fun birthday card that could be used for any age, and i thought uaing this stamp set from Ink Road Stamps, was the perfect touch. It has 6 adorable doggy images, and I chose the fluffiest one in the bunch. I stamped my image on some Park Lane 110# smooth white cardstock, uaing my Memento Tuxedo Black Ink. I added a bit of color by using my number LG2 and LG4 gray tone Spectrum Noir Alcohol Markers. Once my image was fussy cut, I was ready to create my background. I had seen a stencil from My Favorite Things, that has several circles in different sizes and it was used to create this fun background effect with some Distress Inks. Unfortunately, the stencil was sold out. But, I did have some stencil sheets, so I whipped out my circle dies and created my very own stencil! I used my distres...

Color Throwdown Challenge #494

Image
Hello everyone! An extra post for today, because they announced the colors for this week's Color Throwdown Challenge and it's a patriotic one! Celebrating the upcoming Memorial Day weekend, the colors are Red, Blue and White. For this card I used both the Beautiful Flowers stamp set from Simon Says Stamp June card kit and the Forever and Always stamp set from Altenew. I colored my images using both Copic Ciao Markers and Spectrum Noir Alcohol Markers. I wanted to include some fun patterned papers and remembered a old 6x6 paper pad I have from Doodlebug that is perfect. Once all my papers and images were layered, I added a simple sentiment on white cardstock. This one was a truly fun card to put together, and made me think of new ways to add color and detail to these floral images. Make sure to visit Color Throwdown Challenge on Instagram for weekly challenges and inspiration. Happy crafting, Eny Dunn Products used for this card: Tim Holtz Stamp Platform Spectrum No...

Lovely Lilac|Fibromyalgia Awareness Month

Image
Hello everyone! Today I have a card that's very near and dear to my heart. The Month of May is Fibromyalgia awareness month, and the signature color is a gorgeous deep purple. As someone who lives with fibromyalgia, I wanted to create a card that shows how delicate and fragile we can feel. Living with chronic pain, every day we do the best we can to continue pushing forward and carry on with responsibilities. I did a very simple watercolor background, uaing my Gansai Tambi Watercolor Palette and Prima Conffections Shimmer palette. Once it was dry, I was able to die cut the Lovely Lilac Die Set from Spellbinders, using black cardstock for the Silohuette portion of my die cut piece. To add an extra layer, I blended some gold ink on my card base, propped my flower detail on some foam tape, and finished my card with two beautiful sentiments. For the full step by step tutorial and product list, please visit my YouTube Channel . Happy crafting, Eny Dunn

Beautiful Flowers embossed card|SSS June Card Kit

Image
Hello everyone and Happy Monday! Today I wanted to share this card I created, using elements from the new Simon Says Stamp June card kit. The Beautiful Flowers stamp set included in this kit, has beautiful floral images, perfect for a delicate and Intricate card cover. I decided to do a monochromatic look, by using all blues, to create a soft flow on my card cover. I trimmed down one of SSS Cornflower cardstocks to an A2 standard sized card (4.25x5.50), applied some of my anti-static powder tool, and stamped my image with Versa Mark ink so I could hear emboss some Navy Blue Stampendous embossing powder. This will create a fun 3D effect, that's subtle, but beautiful. Once I hear set my powder, I used my American Crafts colored pencils to add soft shades of white, light blue, and navy blue, to my image. Once my sentiments were stamped, I had a card ready for someone's birthday! For the full step by step tutorial and product list, please visit my YouTube Channel . Happy cr...

Craftin Desert Divas DT Call Entry|Shaker Tag

Image
Hello everyone and thank you for joining me again today for another process video. This time I'm sharing with you with Chin Up Buttercup Shaker Tag I made, Including one of Craftin Desert Divas digital images. This project was created to showcase my video tutorials, in hope to become part of the CDD New design team. For this project, I used my Umbrella craft tag nesting dies set to cut a sheet of Canson Mixed Media paper and also a sheet of Heat resistant acetate. I created a simple watercolor background using some Gansai Tambi and Prima Watercolor Conffections palettes. For my sentiment, I used the Chin Up Buttercup Ink Road Stamps stamp set, heat embossed with some Versa Mark ink and Ranger white embossing powder. I colored by adorable bee image with some Copic Ciao Markers , and my American Crafts colored pencils. To finish off my stamping, I used the honeycomb images in the Chin Up Buttercup set, to add some detail to my tag cover. Once everything was adhered with some fo...

Color Throwdown Challenge #493

Image
Hello everyone and welcome to another Card Making project, using as inspiration this week's Color Throwdown Challenge. The colors to be used this week are Teal, Lime Green and White. Simple spring/summer colors, that I thought would pair well with the new stamp set from Crafting Desert Divas called Kindness. This stamp set features a beautiful floral image that I used on both corners to create a simple , yet elegant border. I decided to color the image with my Copic Ciao Markers, following the color scheme and using some gray to add shading.  I softly added some background color with various Distress Inks, this truly helped to make the focus of this card cover the floral image. These color challenges have pushed my creativity and given a new freedom I needed to explore mediums, use things I had forgotten i had in my stash and has been a fun experience so far. I encourage everyone to check out their Instagram for the week challenges . Also, pleas e visit Craftin Desert Divas o...

Action Wobble Mermaid Card

Image
Hello everyone! Today's card is a fun one! I decided to color this Some Odd Girl mermaid image and give her an interactive element, by propping her up on one of my action wobbles. This sticky dimensional, makes it easy to add a little shake and movement to any image, on any project. Once all cardstock, images and shapes were cut, this was a quick and easy card to put together. I decided to color this beautiful mermaid behind the scenes, using some of my go-to Copic colors. Added a few sequins for shine and my card is done! For the full step by step tutorial and product list, please visit my YouTube Channel. Happy crafting, Eny Dunn

Color Throwdown Challenge #492

Image
Hello everyone and Happy Thursday! It was teachers day yesterday here in the USA, and I had been waiting patiently for this stamp set from Some Odd Girl to arrive to be able to create this card. With these weeks colors being Red, Yellow, Gray and White, I thought it was a great color combo to showcase this set. I used several different mediums for this card Including distress oxide inks, Zig Clean Colors and Copic Ciao Markers. I kept this cover very simple, by doing a linear, one layer and uaing a circle die and dimensional glue dots to add a pop. This was a very quick and easy card to put together, and I think it's perfect for any teacher on any occasion. All products will be listed below. Happy crafting, Eny Dunn Product list: Candy Apple Distress Oxide Squeezed Lemonade Distress Oxide Zig Clean Color in Gray Copic colors: Skin - E00, E11 Hair- E21, E15, E37 Dress and accessories- R29, Y06, B00, C-3 Stamps used: Some Odd Girl Teacher Mae Hampton Art Floral Set ...

Mothers Day Card|Spellbinders|Distress Oxide Inks

Image
Hello everyone and Happy Monday! Today I wanted to share another Card Making project, this time using one of my new Spellbinders die sets, You Mean The World To Me! This set is designed for card covers, and will fit perfectly a standard A2 size card (4.25x5.50). I wanted to really focus on this beautiful die set, so I created a soft background using some Distress Oxide Inks and adding a gold shimmer finish. I love being able to put together a super sinple, yet gorgeous, card for holidays and special occasions. For the full step by step tutorial and product list, please visit my YouTube Channel . Happy crafting, Eny Dunn

Color Throwdown Challenge #491 | Ink Road Stamps

Image
Hello everyone and welcome to another color Throwdown Challenge! For this week's challenge we had to use Coral, Green, Kraft and White in our cards and projects and I thought it would also be the perfect opportunity to use one of my favorite stamps from Ink Road Stamps, Bloom Where You Are Planted. I wanted to create a dimensional card, so I used my Spellbinders Platinum 6 Machine to cut some Hexagon and Curved Rectangle nesting dies from Spellbinders. To create the dimensional effect, I stamped my images on both die cuts, by laying one right on top of the other. This creates a "cut apart" effect, that fools the eyes and adds a layer of interest to my card cover. This was the perfect opportunity to also showcase the American Crafts colored pencils I recently got, and they worked very well to add some simple color to my images. These color challenges are amazing, and give a boost of creativity. I encourage anyone and everyone to follow along on their Instagram for we...

10 Cards, One Kit| SSS May Kit| Pink Fresh Studio Elements

Image
Hello everyone, Thank you for joining me again for another Card Making video. Today I wanted to share how quick and easy it is to create 10 cards, using one paper or card kit. For these cards, I didn't stamp any images or use fancy mediums, I simply used some patterned 6x6 paper, puffy and enamel stickers, and my card bases. I went with the tried and true A2 size card (4.25x5.50) but decided to make five of the cards top folding and the other five side folding, to switch it up a bit. Took me about 20 minutes to create all these cards, and it was rather therapeutic. I had some snacks, my kids were in the room with me, and it was great to be able to create without over thinking the process. Just some simple layering to have some cards ready for any occasion. For the full step by step tutorial, please visit my YouTube Channel . Happy crafting, Eny Dunn

Mother's Day Card| feat. Simon Says Stamp

Image
Good morning and happy Monday! Thank you so much for joining me on yet another Card Making video. I had a lot of fun creating this card, because I was able to use two new products from Simon Says Stamp. The center cut background stamp and "mom" die set, were part of their exclusive mothers day card kit 2018. Some items included in the kit are sold separately (the die set) and some releases are meant to be used with an overall theme, like the center cut stamp. They have a variety of stamps similar to this one. It makes it fun and easy to create intricate backgrounds, or use just one element to create a unique detail. I wanted to use my watercolor palette for my background, so I decided to heat emboss my main image, to add an extra layer and pop of color. A raised edge works great for watercoloring, to keep each color seperate from the other, but I just wanted an extra touch to background, to help my watercolor stand out more. Using some scraps of paper I had in my stash, I...

Some Odd Girl Birthday Stamp (DT Call Entry)

Image
Hello everyone! This one is a late night post, but I couldn't wait to share! This beauty here is from Some Odd Girl's digital stamp selection, Birthday Wishes. She is fun and happy, and I couldn't wait to color her. For this particular image, I used my Copic Ciao Markers (list of colors at end of post) , to add shading and highlight. Inspired by a 6x6 Echo Park birthday paper pack, I created a vibrant, colorful card, perfect for celebrating a loved ones birthday. By creating simple layers, I add a touch of interest, without taking away from the image. I really wanted her to stand out, even more than she already does. I'm so happy to have stumbled upon this growing company, that creates fun and affordable physical and digital stamps for all occasions. Visit Some Odd Girl on Instagram , to get a glimpse of what they have to offer. Happy crafting, Eny Dunn Copic Ciao Markers used for this card: Skin: E00 E11 Hair: E21 E37 E29 Clothes: RV02 RV04 R20 V12...

Color Throwdown Challenge #490

Image
Hello everyone, Today I'm sharing this week's Color Throwdown Challenge, by creating this card using various stamps from Hampton Art and Joann's, and Distress Inks. This week's Color combo was pink, lavender,green and gray. I wanted to create a floral background, with a layered touch. The distress inks help in creating this effect, without mudding the color too much. I decided to take this opportunity to try a technique by one of my favorite card makers, Amy Rysavy. She layers sentiments she die cut, adhering one on top of the other, until she gets the dimension she wants. By cutting the word love on my background ,I have a space for my dimension element, but also can use that cut apart to continue the flow of the background. I love how this card turned out, and I believe this week's colors really helped get look I wanted. For all the details on this week's Color Throwdown Challenge and how to enter please visit their Instagram account . Happy crafting, ...