Posts

Showing posts with the label simple cards

OddBall Art Blog Challenge

Image
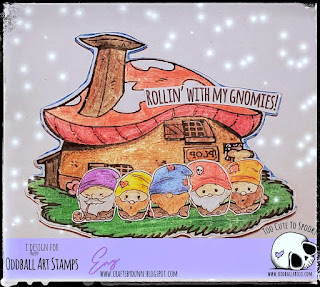
Hello everyone! It's the 1st of the month, and that means another blog challenge over at OddBall Art . This months theme is Naughty Gnomes, and appropriately enough, I have chosen imagine #461 Naughty Gnomes for my DT entry. For this fun cover, I decided to pair the gnomes with a fun Mushroom House coloring page I got from Pinterest. To keep it simple, I colored my images using my American Crafts colored pencils. I love the monthly challenges, because it gives everyone the opportunity to try something new, push their creativity and use some creepy cute images! I cant wait to see what you all come up with. If you need any digital images for this challenge, make sure to use coupon code DTENY10 for 10% off your purchase! Happy Crafting! Eny Dunn

Chin Up Buttercup

Image
Floral images and a great sentiment are my weakness! I love combining different stamp sets, to make my vision come to life. It also serves as a great opportunity to try different mediums and techniques. For this simple card cover, I used the Chin Up Buttercup stamp set from Ink Road Stamps paired with one of the floral images from the Poppy stamp set from Stampendous. I wanted to create levels of color, using my Spectrum Noir Alcohol Markers and my distress inks. I stamped my floral image over Tim Holtz distress watercolor paper, and colored it using various shades of pink, yellow and green distress inks. Once it was dry, I was able to fussy cut it and proceeded to create my background. I created the effect of broad brush stories by using the broad tip aide of my Spectrum markers, going from lightest pink, to darkest pink. At the bottom right corner, I stamped my chin up Buttercup sentiment and added a few details using the mini flowers included in that set. I adhered my large ...

Let's Celebrate Card|Spellbinders Small Die of The Month Kit

Image
Hello everyone and Happy Monday! I love celebrating birthdays and special occasions. It's always fun to be able to create something unique and from the heart, for a special someone. Today I'm sharing a quick card I created uaing this month's Spellbinders Small Die of The Month Kit and a sentiment from last year's June Kit. It may be called small, in no way does it refer to the amount of love put in this kit. For the month June, you get a adorable cupcake die set, with a candles and flower detail, perfect for creating handmade birthday love! I used one of the glitter paper packs from Die Cuts With A View and a American Crafts birthday paper pad, to cut all my images. Creating this cover to celebrate my nieces birthday , I used one of the sentiments from last year's kit, that appropriately says "Let's Celebrate". I adhered all my components over a standard A2 size card (4.25x5.50) and finished it off with some colorful Nuvo Crystal drops! These die ...

Quick and Easy Spring Card|Newton's Nook Stamps

Image
Hello everyone and Happy Friday! Today's card was inspired by this adorable stamp set from Newton's Nook, that has a fun play on the "April showers, bring May flowers" sentiment. I wanted to create a colorful background, so I used my cloud border stencil, and distress inks, to add a soft sunrising effect to my cover. I had in my stash a die set from Peachy Cheap that I acquired a while back, and it has this adorable person holding an umbrella and wearing rain boots. Using the same smooth white cardstock I used for my background, I cut the piece using my Spellbinders Platinum 6 Machine. Added a bit of color to my image my using the same distress inks as my background. I wanted to add a simple ground where my person could stand on , and I created the look of grass by using three different shades of green of my Copic markers. Using a flick motion along the bottom of my cover. I stamped my sentiment, and adhered my die cut, added some enamel accents and done! For th...

Color Throwdown Challenge #494

Image
Hello everyone! An extra post for today, because they announced the colors for this week's Color Throwdown Challenge and it's a patriotic one! Celebrating the upcoming Memorial Day weekend, the colors are Red, Blue and White. For this card I used both the Beautiful Flowers stamp set from Simon Says Stamp June card kit and the Forever and Always stamp set from Altenew. I colored my images using both Copic Ciao Markers and Spectrum Noir Alcohol Markers. I wanted to include some fun patterned papers and remembered a old 6x6 paper pad I have from Doodlebug that is perfect. Once all my papers and images were layered, I added a simple sentiment on white cardstock. This one was a truly fun card to put together, and made me think of new ways to add color and detail to these floral images. Make sure to visit Color Throwdown Challenge on Instagram for weekly challenges and inspiration. Happy crafting, Eny Dunn Products used for this card: Tim Holtz Stamp Platform Spectrum No...

Action Wobble Mermaid Card

Image
Hello everyone! Today's card is a fun one! I decided to color this Some Odd Girl mermaid image and give her an interactive element, by propping her up on one of my action wobbles. This sticky dimensional, makes it easy to add a little shake and movement to any image, on any project. Once all cardstock, images and shapes were cut, this was a quick and easy card to put together. I decided to color this beautiful mermaid behind the scenes, using some of my go-to Copic colors. Added a few sequins for shine and my card is done! For the full step by step tutorial and product list, please visit my YouTube Channel. Happy crafting, Eny Dunn

Color Throwdown Challenge #492

Image
Hello everyone and Happy Thursday! It was teachers day yesterday here in the USA, and I had been waiting patiently for this stamp set from Some Odd Girl to arrive to be able to create this card. With these weeks colors being Red, Yellow, Gray and White, I thought it was a great color combo to showcase this set. I used several different mediums for this card Including distress oxide inks, Zig Clean Colors and Copic Ciao Markers. I kept this cover very simple, by doing a linear, one layer and uaing a circle die and dimensional glue dots to add a pop. This was a very quick and easy card to put together, and I think it's perfect for any teacher on any occasion. All products will be listed below. Happy crafting, Eny Dunn Product list: Candy Apple Distress Oxide Squeezed Lemonade Distress Oxide Zig Clean Color in Gray Copic colors: Skin - E00, E11 Hair- E21, E15, E37 Dress and accessories- R29, Y06, B00, C-3 Stamps used: Some Odd Girl Teacher Mae Hampton Art Floral Set ...

Mothers Day Card|Spellbinders|Distress Oxide Inks

Image
Hello everyone and Happy Monday! Today I wanted to share another Card Making project, this time using one of my new Spellbinders die sets, You Mean The World To Me! This set is designed for card covers, and will fit perfectly a standard A2 size card (4.25x5.50). I wanted to really focus on this beautiful die set, so I created a soft background using some Distress Oxide Inks and adding a gold shimmer finish. I love being able to put together a super sinple, yet gorgeous, card for holidays and special occasions. For the full step by step tutorial and product list, please visit my YouTube Channel . Happy crafting, Eny Dunn

10 Cards, One Kit| SSS May Kit| Pink Fresh Studio Elements

Image
Hello everyone, Thank you for joining me again for another Card Making video. Today I wanted to share how quick and easy it is to create 10 cards, using one paper or card kit. For these cards, I didn't stamp any images or use fancy mediums, I simply used some patterned 6x6 paper, puffy and enamel stickers, and my card bases. I went with the tried and true A2 size card (4.25x5.50) but decided to make five of the cards top folding and the other five side folding, to switch it up a bit. Took me about 20 minutes to create all these cards, and it was rather therapeutic. I had some snacks, my kids were in the room with me, and it was great to be able to create without over thinking the process. Just some simple layering to have some cards ready for any occasion. For the full step by step tutorial, please visit my YouTube Channel . Happy crafting, Eny Dunn

Mother's Day Card| feat. Simon Says Stamp

Image
Good morning and happy Monday! Thank you so much for joining me on yet another Card Making video. I had a lot of fun creating this card, because I was able to use two new products from Simon Says Stamp. The center cut background stamp and "mom" die set, were part of their exclusive mothers day card kit 2018. Some items included in the kit are sold separately (the die set) and some releases are meant to be used with an overall theme, like the center cut stamp. They have a variety of stamps similar to this one. It makes it fun and easy to create intricate backgrounds, or use just one element to create a unique detail. I wanted to use my watercolor palette for my background, so I decided to heat emboss my main image, to add an extra layer and pop of color. A raised edge works great for watercoloring, to keep each color seperate from the other, but I just wanted an extra touch to background, to help my watercolor stand out more. Using some scraps of paper I had in my stash, I...

Some Odd Girl Birthday Stamp (DT Call Entry)

Image
Hello everyone! This one is a late night post, but I couldn't wait to share! This beauty here is from Some Odd Girl's digital stamp selection, Birthday Wishes. She is fun and happy, and I couldn't wait to color her. For this particular image, I used my Copic Ciao Markers (list of colors at end of post) , to add shading and highlight. Inspired by a 6x6 Echo Park birthday paper pack, I created a vibrant, colorful card, perfect for celebrating a loved ones birthday. By creating simple layers, I add a touch of interest, without taking away from the image. I really wanted her to stand out, even more than she already does. I'm so happy to have stumbled upon this growing company, that creates fun and affordable physical and digital stamps for all occasions. Visit Some Odd Girl on Instagram , to get a glimpse of what they have to offer. Happy crafting, Eny Dunn Copic Ciao Markers used for this card: Skin: E00 E11 Hair: E21 E37 E29 Clothes: RV02 RV04 R20 V12...

Quick and Easy Box Card

Image
Hello everyone! I hope you're all having an amazing Wednesday. Today I wanted to share a quick and easy way to create a box card. Uaing a mini pizza box template and design for my idea, this one is so easy to recreate, you'll want to make a few before the day is done. With just two sheets of 6x6 paper, you can create one 4x4 box, perfect for adding a gift card, pop up elements or any other goodies you want to gift. Making sure one of the sheets is slightly smaller in size, you will score each corner at 1 inch, and create notches to assemble a cute little box. Make sure to use a strong adhesive for this one, score tape should do the trick! For the full step by step tutorial, make sure to visit my YouTube Channel . Happy crafting, Eny Dunn

Simple Double Fold Card

Image
Hello everyone, Welcome to another Card Making video and post. Today I wanted to share a simple double fold card, perfect for adding a interactive element to your card, without all the hassle, extra trimming or die cutting. Today I used a Jane Dunn Hampton Art clear stamp. These layered flowers add a wonderful touch to any card. By stamping my images with distress oxides, I achieve a chalk or matte look, that plays well with the simplicity of the overall look. I added a bit of interest by embellishing my cover with some washi tape and enamel accents. When you open the second fold, you see a simple sentiment and flower details, keeping the main focus on the cover and giving enough room to write a heartfelt note. For the full step by step tutorial and product list, please visit my YouTube Channel. Make sure to follow me on all my social media accounts, so you may be notified of all new tutorials , sneak peeks, and project shares. Happy crafting, Eny Dunn