Posts

Showing posts with the label diy

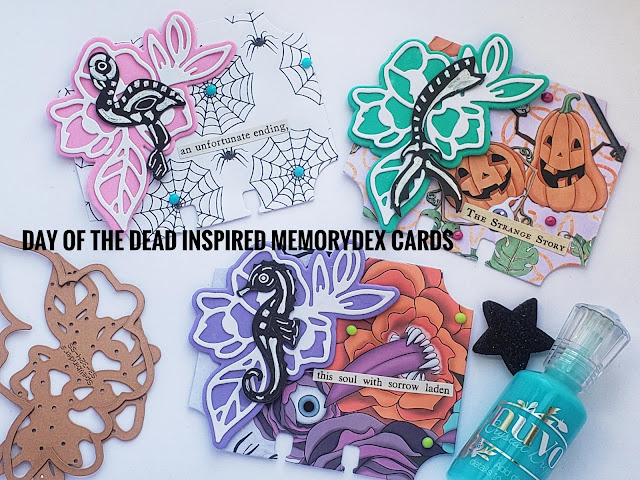
Halloween Shadowbox feat ADORNit

Image
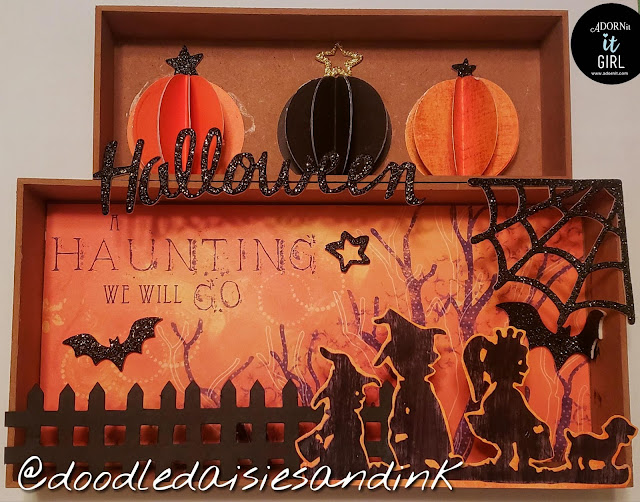
Hello everyone and happy Tuesday! Today I have a fun project to share with all of you. I had found some ArtC nesting boxes in a local craft store, that I thought would be perfect for creating a halloween shadowbox! Using a 2 inch punch, I punched out 5 circles (5 in black, 5 in light orange and 5 in a darker orange) , folded each circle in half, and adhered each same colored circles end to end to create mini paper pumpkins. I love a subtle 3D effect,  and these are perfect for decor and party favors. For my larger box , I used one of the apes from the Classic Halloween Paper Pack to create a simple background. I loved the little trick or treaters found in the  halloween sticker pack , so I adhered then to some cardstock to make them extra sturdy and used them to add dimensions to my piece. I added a few glitter stickers I had in my stash, glued both boxes together and my decor piece is done! I hope this project inspires you to create something fun today! Happy crafting...

DIY Spellbook Gift Box

Image
Hello everyone! Welcome to this special edition of Halloween videos. Why is it special? I am stepping out of my comfort zone and taking you a long for the ride! I wanted to recreate the book shaped gift boxes they sell every year at craft stores, and let's just say, it was quite the journey. I struggled to find my groove, and make all my elements work in my favor, but I guess that's what crafting is all about. Even with prepping, and writing all my details down, I still found some of my portions working against me. But, I do love the overall look and final product of this make. I hope you will join me today for another video tutorial, and a bit of chit chat, and that it inspires you to create something fun today! Please visit my YouTube channel for the full step by step instructions,  and final product reveal! Happy crafting, Eny Dunn

Day of the Dead Inspired Memorydex Cards

Image
Hello everyone! Welcome  to another episode of my Halloween 2018 video series! Today I have a really fun project to share with all of you. While browsing Pinterest for halloween inspiration, I stumbled upon a really cool piece of altered home decor. Lota of people have taken their flamingo lawn ornaments and upcycled them, for use in Halloween decorations! I then wondered if other critters had been given the skeleton treatment, and to my surprise,  they have! Lots of fun images started to pop up and I had my idea. Today I created these fun Day of the Dead inspired memorydex cards,  using dies and items I had in my stash. For the full tutorial and all the details,  please visit my YouTube channel . Happy Crafting, Eny Dunn

Halloween Cacti Embellishments

Image
Hello everyone and welcome to another fun ADORNit project! For this particular design, I used one of the paintable sheets, Cactus Love,  full of fun and beautiful cacti images. My dear friend Jennifer loves all things cactus, succulents and halloween. And I thought it would be a great idea to color and create some embellishments she can use for all her future Halloween projects. I wanted to keep it simple and only add some dimensional, glitter stickers , and keep the color true to both the holiday and the cacti. Sometimes, creating something new can take you put of your comfort zone,  and allows for fun creations! If you would like to recreate these , you can find the product by visiting the ADORNit website . Remember to share them with me on Instagram @doodledaisiesandink! Happy Crafting, Eny Dunn

OddBall Art Blog Challenge

Image
Hello everyone! It's the 1st of the month, and that means another blog challenge over at OddBall Art . This months theme is Naughty Gnomes, and appropriately enough, I have chosen imagine #461 Naughty Gnomes for my DT entry. For this fun cover, I decided to pair the gnomes with a fun Mushroom House coloring page I got from Pinterest. To keep it simple, I colored my images using my American Crafts colored pencils. I love the monthly challenges, because it gives everyone the opportunity to try something new, push their creativity and use some creepy cute images! I cant wait to see what you all come up with. If you need any digital images for this challenge, make sure to use coupon code DTENY10 for 10% off your purchase! Happy Crafting! Eny Dunn

DIY Bookmarks|ADORNit Paintable Sheets

Image
Hello everyone! It's been a while since I've shared a project,  and today I have a super quick and easy one for you. I colored four different images included in a ADORNit Paintable sheet and turned them into some fun bookmarks! I love these paintable sheets.  They take away the grind of staming,  and they include some amazing and fun images that can be used for any and all paper craft projects. To color these, I used my Spectrum Noir Alcohol Markers. It can be a little tricky with the watercolor paper, but the end result is worth it! I trimmed the excess paper, leaving only the images I wanted to use and then ran them through my laminator,  t make them extra sturdy. I now have 4 great gifts ready for any occasion. Make sure to visit the ADORNit website today to find out about all their amazing products, and stay tuned to my blog  for all future projects and tutorials. Happy  crafting, Eny Dunn

Quick and Easy Spring Card|Newton's Nook Stamps

Image
Hello everyone and Happy Friday! Today's card was inspired by this adorable stamp set from Newton's Nook, that has a fun play on the "April showers, bring May flowers" sentiment. I wanted to create a colorful background, so I used my cloud border stencil, and distress inks, to add a soft sunrising effect to my cover. I had in my stash a die set from Peachy Cheap that I acquired a while back, and it has this adorable person holding an umbrella and wearing rain boots. Using the same smooth white cardstock I used for my background, I cut the piece using my Spellbinders Platinum 6 Machine. Added a bit of color to my image my using the same distress inks as my background. I wanted to add a simple ground where my person could stand on , and I created the look of grass by using three different shades of green of my Copic markers. Using a flick motion along the bottom of my cover. I stamped my sentiment, and adhered my die cut, added some enamel accents and done! For th...

Happy BORKday Card|Spellbinders and Ink Road Stamps

Image
Hello everyone and welcome to another Card Making #tutorial, this time using the Count The Stars Stamp and Die set from Spellbinders with the Bork stamp set from Ink Road Stamps! I wanted to create a fun birthday card that could be used for any age, and i thought uaing this stamp set from Ink Road Stamps, was the perfect touch. It has 6 adorable doggy images, and I chose the fluffiest one in the bunch. I stamped my image on some Park Lane 110# smooth white cardstock, uaing my Memento Tuxedo Black Ink. I added a bit of color by using my number LG2 and LG4 gray tone Spectrum Noir Alcohol Markers. Once my image was fussy cut, I was ready to create my background. I had seen a stencil from My Favorite Things, that has several circles in different sizes and it was used to create this fun background effect with some Distress Inks. Unfortunately, the stencil was sold out. But, I did have some stencil sheets, so I whipped out my circle dies and created my very own stencil! I used my distres...

Diy Bookmarks|Kindred Stamps

Image
Hello everyone and Happy Friday! For today's project, I wanted to share these bookmarks I had made a little while back, using the Hunters stamp set from Kindred Stamps and the cloud border stencil I made. I stamped both my images as close to the top portion of my paper as possible, still leaving enough room to trim and fussy cut later on. For my coloring I used my Copic Markers, but truth be told, you can use any coloring medium you like, and any color combo. Since this stamp set is based on the show Supernatural, you can choose any color for their clothes. I kept it simple, and did minimal shading and highlight, just laying down my colors to make the images stand out. With my cloud border stencil, starting at the bottom of my paper, I stencils these clouds using Mermaid Lagoon distress oxide ink and my blending tool. I then trimmed and fussy cut around my image, so that they would stand out whenever you use them in a book. I ran both of my bookmarks through my Scotch lamina...

Color Throwdown Challenge #494

Image
Hello everyone! An extra post for today, because they announced the colors for this week's Color Throwdown Challenge and it's a patriotic one! Celebrating the upcoming Memorial Day weekend, the colors are Red, Blue and White. For this card I used both the Beautiful Flowers stamp set from Simon Says Stamp June card kit and the Forever and Always stamp set from Altenew. I colored my images using both Copic Ciao Markers and Spectrum Noir Alcohol Markers. I wanted to include some fun patterned papers and remembered a old 6x6 paper pad I have from Doodlebug that is perfect. Once all my papers and images were layered, I added a simple sentiment on white cardstock. This one was a truly fun card to put together, and made me think of new ways to add color and detail to these floral images. Make sure to visit Color Throwdown Challenge on Instagram for weekly challenges and inspiration. Happy crafting, Eny Dunn Products used for this card: Tim Holtz Stamp Platform Spectrum No...

Color Throwdown Challenge #489

Image
Hello everyone and welcome to another Card Making post! Today I wanted to share another color Throwdown , this time with a video! For this week's challenge the colors were Red, Green and White. With those colors we think Christmas, but truly this color combo can be used all year round. I wanted to keep the card simple, with the focus completely on the colors. I used two sheets of my Canson Mixed Media Paper, and blended some Distress Oxide Candied Apple and Distress Ink Mowed Lawn, one color on each sheet. To add some texture, I activated the distress effect, by splattering some water over the inks, and then gently dabbing them with a power towel to pick up any excess water. Once they were dry, I was able to cut some Stitched Heart Dies in various sizes to use for my card cover. With a simple Love sentiment on black cardstock, this card is simple, yet perfect for any occassion. For the full tutorial and step by step details, please visit my YouTube Channel. Happy crafting, En...

Egg Easter Scene Shaker Wand

Image
Hello everyone, Eny here with DoodleChips Crafts! I have a quick and easy project to share with you today. I recently found these egg containers at Dollar Tree, with enough depth to use for some shaker fun! I used stickers, crinkle paper and lots of shaker bits, to create a fun and simple shaker wand. These are always perfect gifts, and are so fun to create. You can use this concept and create fun wall decor, Easter egg hun goodie gifts and so much more. Just another way to show some love, without breaking the bank! Make sure to check my video tutorial for all the details! Happy crafting, Eny 💖

Pocket Letter Size Memorydex Cards

Image
Hello everyone and Happy Wednesday! Today I wanted to share a quick and fun project using some Darice nesting dies I acquire through the Consumer Crafts website. Following the Memorydex Card craze , I wanted to be able to include them inside the pocket letter itself! I searched through my stash, and remembered I has these metal dies in my posession. I chose my favorite 6x6 papers from WRMK and Crate Paper and got to work. I chose two, do the three smallest dies to create the base for my Mini memorydex cards. To create the notch ,I used my Martha Stewart hole puncher. It just the right size for tiny projects like these. Once I had the base complete, it was time to embellish and add details. My favorite part. Working with a smaller space, I chose to go with a clean look and layering. I am so happy with how these cuties turned out, and I hope you will check out the full tutorial, available in my YouTube Channel Happy crafting, Eny Dunn