Posts

Showing posts from 2021

Eny/AECP/Masking Unleashed/Altenew

Image
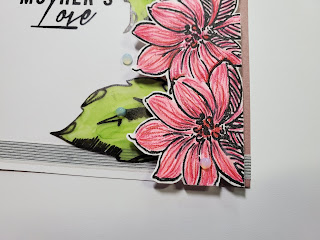
  Hello everyone! I'm back, with my final project for the Altenew Academy Level 2 classes! Todays project features techniques learned during the Masking Unleashed class. I created a fun and vibrant, yet simple card, that i hope inspires you to try out some of these techniques yourself. For this card I will be using the Altenew Wild Hibiscus stamp set, as my main images. I begin by trimming a sheet of heavy weight white cardstock, down to 4.5x5.50 inches. I stamp my first flowers close to the center of the panel. I will stamp this same image, over Avery Removable Label sticker, and cut a long the silhouette to create my "mask". I remove the backing from the label, and then adhere on top of the stamped image on my panel. This allows for foreground and background details on my panel. I repeated the mask process for each flower image (or whatever image being used), so I can fully cover the images on my panel, before continuing my card. Before removing the masks, I will add co

Eny/AECP/With a Twist/Altenew

Image
  Hello everyone! I'm back with another Altenew Educator Program class project, and this one is by far one of my favorite classes. Not only is Therese Calvird an absolute gem of an instructor, but she made it fun and interesting with new (and some well known) techniques. I begin by trimming a heavy weight sheet of white cardstock down to 6x6 and lay the Altenew Woven Stencil right on top, and secure it with some washi tape. I will be using Distress Oxide Inks Spun Sugar, Worn Lipstick and Seedless Preserves to transfer the stencil image on to my paper. I will go from lighest to darkest colors, making sure to blend each color as I go.  Once all the color is applied, I remove my stencil, and then trim the cardstock down to a standard A2 American size card (4.25x5.50) . Using a circle die, I will cut a portion of the left side of my panel, and I will be left with an opening or window.  Using the Altenew Crisp Dye Inks Soft Lilac, Lavender Fields, Deep Iris and Midnight Violet ; I begi

Eny/AECP/Magical Marker Techniques/Altenew

Image
  Hello everyone! Today I'm sjaring another fun Altenew project, for the Altenew Academy Educator Program. Magical Marker Techniques is a wonderful class, that teaches you how to use markers, beyond coloring images. We learned how to use stencils to add an extra fun tough to cards/projects, and upon seeing that technique, I immediately knew I wanted to make an Abstract card. For todays make, I will be using Altenew Splatter Stencil, Aletnew Coffee With A Splash stamp set, and ArtnFly Alcohol Sketch markers. I began my project by trimming a Neenah 110lb Solar White sheet, down to 4.25x5.50 (Standard American A2 size card panel) and using VersaFine Onyx Black ink, stamped one of the coffee mugs and "stain" images from the stamp set. I then placed the stencil over my panel, and with a very light brown/orange alcohol markers, i traced a few of the splatter details. I used several shades of brown to add extra color to the splatter and stains. I always make sure i have a nice b

Eny/AECP/Beautiful Details/Altenew

Image
  Hello everyone! Todays Altenew Educator Program project, is one of my favorites I've worked on. The Beautiful Details class from Marikah Rahtu, truly awoke within me the desire to create beautiful and intricate designs for my cards. During this class, we learned how to take any image to the next level. Whether by adding pencil or marker details, to using vellum paper, or creating fun scribbles...this class had a bit of everything for every style. I began my card by trimming a Neenah 110lb Smooth White Cardstock, down to 4.25x.5.50. Today I will be doing a bit of masking, and using Avery removable labels and Altenew Wild Hibiscus stamp set.   I first stamp my image on the Avery label and fussy cut as close to the outline as possible.  I stamped the image on the cardstock, and then place the label right on top of that stamped image. Make sure to align it perfectly, because we will be stamping over it. I continue moving the label and placing on top of each new image i placed on my p

Eny/AECP/Impressive Heat Embossing/Altenew

Image
  Hello everyone! Today I continue my Altenew Academy Educator Program journey, by sharing my card for the Impressive Heat Embossing class given by the wonderful Svetlana Marchenko! Learned a lot of wonderful techniques, and though this card is easy to make, it still looks beautiful. I began with purple and green vellum paper (8.5x11), found mine on Amazon, but you can also find at local craft stores. This particular vellum has a very matt, "full coverage" look and a slight metallic finish. I cut it in half to use for the images, and the rest for my main background. The images I will be heat embossing today are from the Altenew Inked Flora stamp set. I will be using the smallest flower and one of the leaves included in the set. To begin my heat embossing, I first prepare the surface with antistatic powder. You can also use baby powder or static sheet. This helps to keep the embossing powder away from the surface that isn't inked.  I used the purple vellum for my flowers a

Eny/AECP/Creative Watercolor Media/Altenew

Image
  Hello everyone! So excited to be back again with another Altenew project. I recently did two back-to-back classes that involved using heat embossing in some fashion, and I quickly got to crafting. The first class was Creative Watercolor Media, and I will be sharing my favorite way to quickly color images using watercolor, to make fail proof. I began by trimming a piece of 110lb watercolor cardstock (I used Canson watercolor paper) down to 4.25x5.50 , and doing a light coating on anti static powder. This will prevent the embossing powder from sticking to other areas that aren’t the stamped image. I used VersaMark Embossing Ink to ink up all my images. For today’s card, I used Geometric Landscape stamp set for my background, and the Inked Rose set for my main images.  To make sure I get a full coat of ink, I am using my MISTI stamping platform. You can use any platform you choose, this helps keep the stamp over the same spot on the paper, so you add ink multiple times until the desired

Eny/AECP/Color Your Day/Altenew

Image
  Hello everyone! I am here once again to share with you a project I made, for the Altenew Academy Educators Program! Today, we are once again bringing all the fun with colors. I recently finished the Color Your Day Class from Therese Calvird, and learned lots of tips to make a card truly pop and stand out! Even with soft pastels, you can use color combos that compliment each other, to create a stubbing panel. I began by trimming a Neenah 80lb White cardstock down to 4.25x5.50, and added a background using Altenew Deco Wonder Stencil and Distress Oxide Inks Antique Linen, Spun Sugar and Speckled Egg. I laid the stencil over my trimmed cardstock, making sure to use tape to hold in place. I began adding color from top to bottom (in the same order as listed above), making sure to blend each color seamlessly, where they connect. I went from lightest to darkest, ending with a nice soft blue shade. This is a very untraditional gradient, but looks lovely against the white paper. I proceed to

Eny/AECP/In The Mood For Color/Altenew

Image
  Hello everyone,  Eny here sharing with you another project for the Altenew Academy Educators Program. Today’s featured class is In The Mood for Color, where we learned how to let each color inspire us. We learned that each color has mood, or feeling behind them, and that those can help us create some wonderful art. For this project, I used a color I never lean towards: Pink.  I began by trimming a Neenah White Cardstock down to 3.50x9 inches. On a separate piece of white cardstock, I will be doing my stamping. I used Altenew Build-A-Flower: Hellebore, and I inked them up using Distress Oxide inks Tattered Rose, Spun Sugar, and Worn Lipstick. I layer up each individual stamp, starting with the lightest color of ink (tattered rose). I add an extra detail, by applying the last layer of the image with Distress Oxide Black Soot.  Even though we’re focusing on the color pink, I wanted the leaves to be true to color, so I used Altenew Crisp Dye Inks Firefly, Grass Fields, and Mountain Pine.