Posts

Showing posts with the label tarjetas

Quick and Easy Spring Card|Newton's Nook Stamps

Image
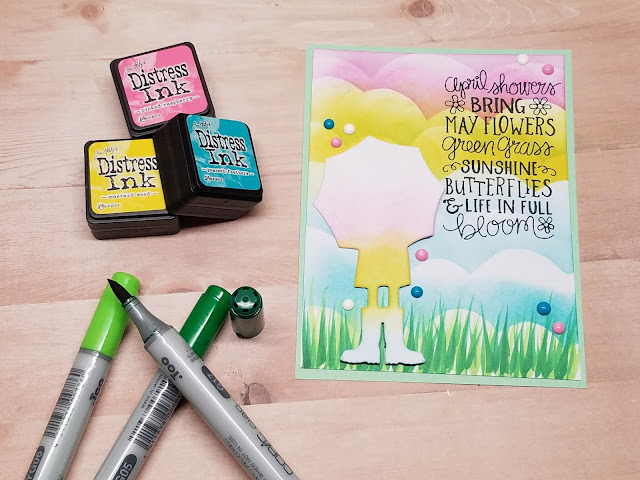
Hello everyone and Happy Friday! Today's card was inspired by this adorable stamp set from Newton's Nook, that has a fun play on the "April showers, bring May flowers" sentiment. I wanted to create a colorful background, so I used my cloud border stencil, and distress inks, to add a soft sunrising effect to my cover. I had in my stash a die set from Peachy Cheap that I acquired a while back, and it has this adorable person holding an umbrella and wearing rain boots. Using the same smooth white cardstock I used for my background, I cut the piece using my Spellbinders Platinum 6 Machine. Added a bit of color to my image my using the same distress inks as my background. I wanted to add a simple ground where my person could stand on , and I created the look of grass by using three different shades of green of my Copic markers. Using a flick motion along the bottom of my cover. I stamped my sentiment, and adhered my die cut, added some enamel accents and done! For th...

Happy BORKday Card|Spellbinders and Ink Road Stamps

Image
Hello everyone and welcome to another Card Making #tutorial, this time using the Count The Stars Stamp and Die set from Spellbinders with the Bork stamp set from Ink Road Stamps! I wanted to create a fun birthday card that could be used for any age, and i thought uaing this stamp set from Ink Road Stamps, was the perfect touch. It has 6 adorable doggy images, and I chose the fluffiest one in the bunch. I stamped my image on some Park Lane 110# smooth white cardstock, uaing my Memento Tuxedo Black Ink. I added a bit of color by using my number LG2 and LG4 gray tone Spectrum Noir Alcohol Markers. Once my image was fussy cut, I was ready to create my background. I had seen a stencil from My Favorite Things, that has several circles in different sizes and it was used to create this fun background effect with some Distress Inks. Unfortunately, the stencil was sold out. But, I did have some stencil sheets, so I whipped out my circle dies and created my very own stencil! I used my distres...

Color Throwdown Challenge #494

Image
Hello everyone! An extra post for today, because they announced the colors for this week's Color Throwdown Challenge and it's a patriotic one! Celebrating the upcoming Memorial Day weekend, the colors are Red, Blue and White. For this card I used both the Beautiful Flowers stamp set from Simon Says Stamp June card kit and the Forever and Always stamp set from Altenew. I colored my images using both Copic Ciao Markers and Spectrum Noir Alcohol Markers. I wanted to include some fun patterned papers and remembered a old 6x6 paper pad I have from Doodlebug that is perfect. Once all my papers and images were layered, I added a simple sentiment on white cardstock. This one was a truly fun card to put together, and made me think of new ways to add color and detail to these floral images. Make sure to visit Color Throwdown Challenge on Instagram for weekly challenges and inspiration. Happy crafting, Eny Dunn Products used for this card: Tim Holtz Stamp Platform Spectrum No...

Beautiful Flowers embossed card|SSS June Card Kit

Image
Hello everyone and Happy Monday! Today I wanted to share this card I created, using elements from the new Simon Says Stamp June card kit. The Beautiful Flowers stamp set included in this kit, has beautiful floral images, perfect for a delicate and Intricate card cover. I decided to do a monochromatic look, by using all blues, to create a soft flow on my card cover. I trimmed down one of SSS Cornflower cardstocks to an A2 standard sized card (4.25x5.50), applied some of my anti-static powder tool, and stamped my image with Versa Mark ink so I could hear emboss some Navy Blue Stampendous embossing powder. This will create a fun 3D effect, that's subtle, but beautiful. Once I hear set my powder, I used my American Crafts colored pencils to add soft shades of white, light blue, and navy blue, to my image. Once my sentiments were stamped, I had a card ready for someone's birthday! For the full step by step tutorial and product list, please visit my YouTube Channel . Happy cr...

Action Wobble Mermaid Card

Image
Hello everyone! Today's card is a fun one! I decided to color this Some Odd Girl mermaid image and give her an interactive element, by propping her up on one of my action wobbles. This sticky dimensional, makes it easy to add a little shake and movement to any image, on any project. Once all cardstock, images and shapes were cut, this was a quick and easy card to put together. I decided to color this beautiful mermaid behind the scenes, using some of my go-to Copic colors. Added a few sequins for shine and my card is done! For the full step by step tutorial and product list, please visit my YouTube Channel. Happy crafting, Eny Dunn

10 Cards, One Kit| SSS May Kit| Pink Fresh Studio Elements

Image
Hello everyone, Thank you for joining me again for another Card Making video. Today I wanted to share how quick and easy it is to create 10 cards, using one paper or card kit. For these cards, I didn't stamp any images or use fancy mediums, I simply used some patterned 6x6 paper, puffy and enamel stickers, and my card bases. I went with the tried and true A2 size card (4.25x5.50) but decided to make five of the cards top folding and the other five side folding, to switch it up a bit. Took me about 20 minutes to create all these cards, and it was rather therapeutic. I had some snacks, my kids were in the room with me, and it was great to be able to create without over thinking the process. Just some simple layering to have some cards ready for any occasion. For the full step by step tutorial, please visit my YouTube Channel . Happy crafting, Eny Dunn

Color Throwdown Challenge #489

Image
Hello everyone and welcome to another Card Making post! Today I wanted to share another color Throwdown , this time with a video! For this week's challenge the colors were Red, Green and White. With those colors we think Christmas, but truly this color combo can be used all year round. I wanted to keep the card simple, with the focus completely on the colors. I used two sheets of my Canson Mixed Media Paper, and blended some Distress Oxide Candied Apple and Distress Ink Mowed Lawn, one color on each sheet. To add some texture, I activated the distress effect, by splattering some water over the inks, and then gently dabbing them with a power towel to pick up any excess water. Once they were dry, I was able to cut some Stitched Heart Dies in various sizes to use for my card cover. With a simple Love sentiment on black cardstock, this card is simple, yet perfect for any occassion. For the full tutorial and step by step details, please visit my YouTube Channel. Happy crafting, En...