Spring Wreath|Xyron Product Feature
Hello everyone!
Happy April 1st! Spring showers have begun in full swing here in Florida, and they have me dreaming of May flowers.
Today, I will be sharing with you my very first project as a Xyron Maker for 2019! I thought it would be fitting to create a lovely Spring Wreath using the Xyron Create-A-Sticker Max machine. This beautiful machine, has a 5" permanent adhesives cartridge, that's not only perfect for creating stickers, but also a quick way to add adhesive to intricate dies.
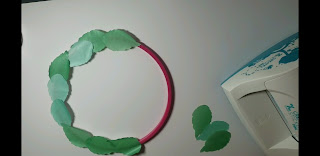
I will be using large plastic embroidery hoop as my base. I find they work wonderful for paper projects.
To begin, I want to fill the entire circumference with greenery. I used a Tim Holtz Sizzix Bigz Die L from to cut out all the leaves I will be using. To give a ethereal, soft effect, I used green glassine paper and gold vellum.
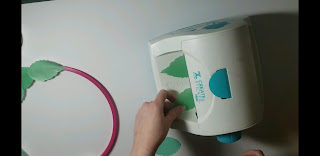
Using the Xyron Create-A-Sticker Max, will make this project come together quick and easy. In place my die cuts on the front slot of the machine, and using the rotating feature, my pieces will come out the back of the machine on a strip of paper. Rotate u till you see your die cuts fully out of the machine, tear the piece of paper and done!
Now you have permanent adhesive included on the back of your die cuts, peel off and use on any smooth surface.
I repeat the process, this time using some Spellbinders flower dies.
I loved creating this project for all of you, and I hope you will catch a full tutorial by visiting my YouTube channel!
Happy Crafting!
Eny Dunn
Happy April 1st! Spring showers have begun in full swing here in Florida, and they have me dreaming of May flowers.
Today, I will be sharing with you my very first project as a Xyron Maker for 2019! I thought it would be fitting to create a lovely Spring Wreath using the Xyron Create-A-Sticker Max machine. This beautiful machine, has a 5" permanent adhesives cartridge, that's not only perfect for creating stickers, but also a quick way to add adhesive to intricate dies.
I will be using large plastic embroidery hoop as my base. I find they work wonderful for paper projects.
To begin, I want to fill the entire circumference with greenery. I used a Tim Holtz Sizzix Bigz Die L from to cut out all the leaves I will be using. To give a ethereal, soft effect, I used green glassine paper and gold vellum.
Using the Xyron Create-A-Sticker Max, will make this project come together quick and easy. In place my die cuts on the front slot of the machine, and using the rotating feature, my pieces will come out the back of the machine on a strip of paper. Rotate u till you see your die cuts fully out of the machine, tear the piece of paper and done!
Now you have permanent adhesive included on the back of your die cuts, peel off and use on any smooth surface.
I repeat the process, this time using some Spellbinders flower dies.
I loved creating this project for all of you, and I hope you will catch a full tutorial by visiting my YouTube channel!
Eny Dunn


Comments
Post a Comment